
View this page as Markdown • #docs #guides #Setup #iOS #macOS #watchOS #tvOS
Swift Setup Guide
Let's include the TelemetryDeck Swift Package in your application and send events!
Prerequisites
This guide assumes you have already created a TelemetryDeck account. If you haven’t yet, please sign up now!
Installing the Swift Package
The TelemetryDeck Swift package uses Swift Package Manager.
- Open Xcode and navigate to the project you want to add TelemetryDeck to
- In the menu, select File -> Add Package Dependencies…. This will open the Swift Package Manager view
- Paste
https://github.com/TelemetryDeck/SwiftSDKinto the search field. - Select the
SwiftSDKpackage that appears in the list - Set the Dependency Rule to Up to Next Major Version
- Press Add Package to continue
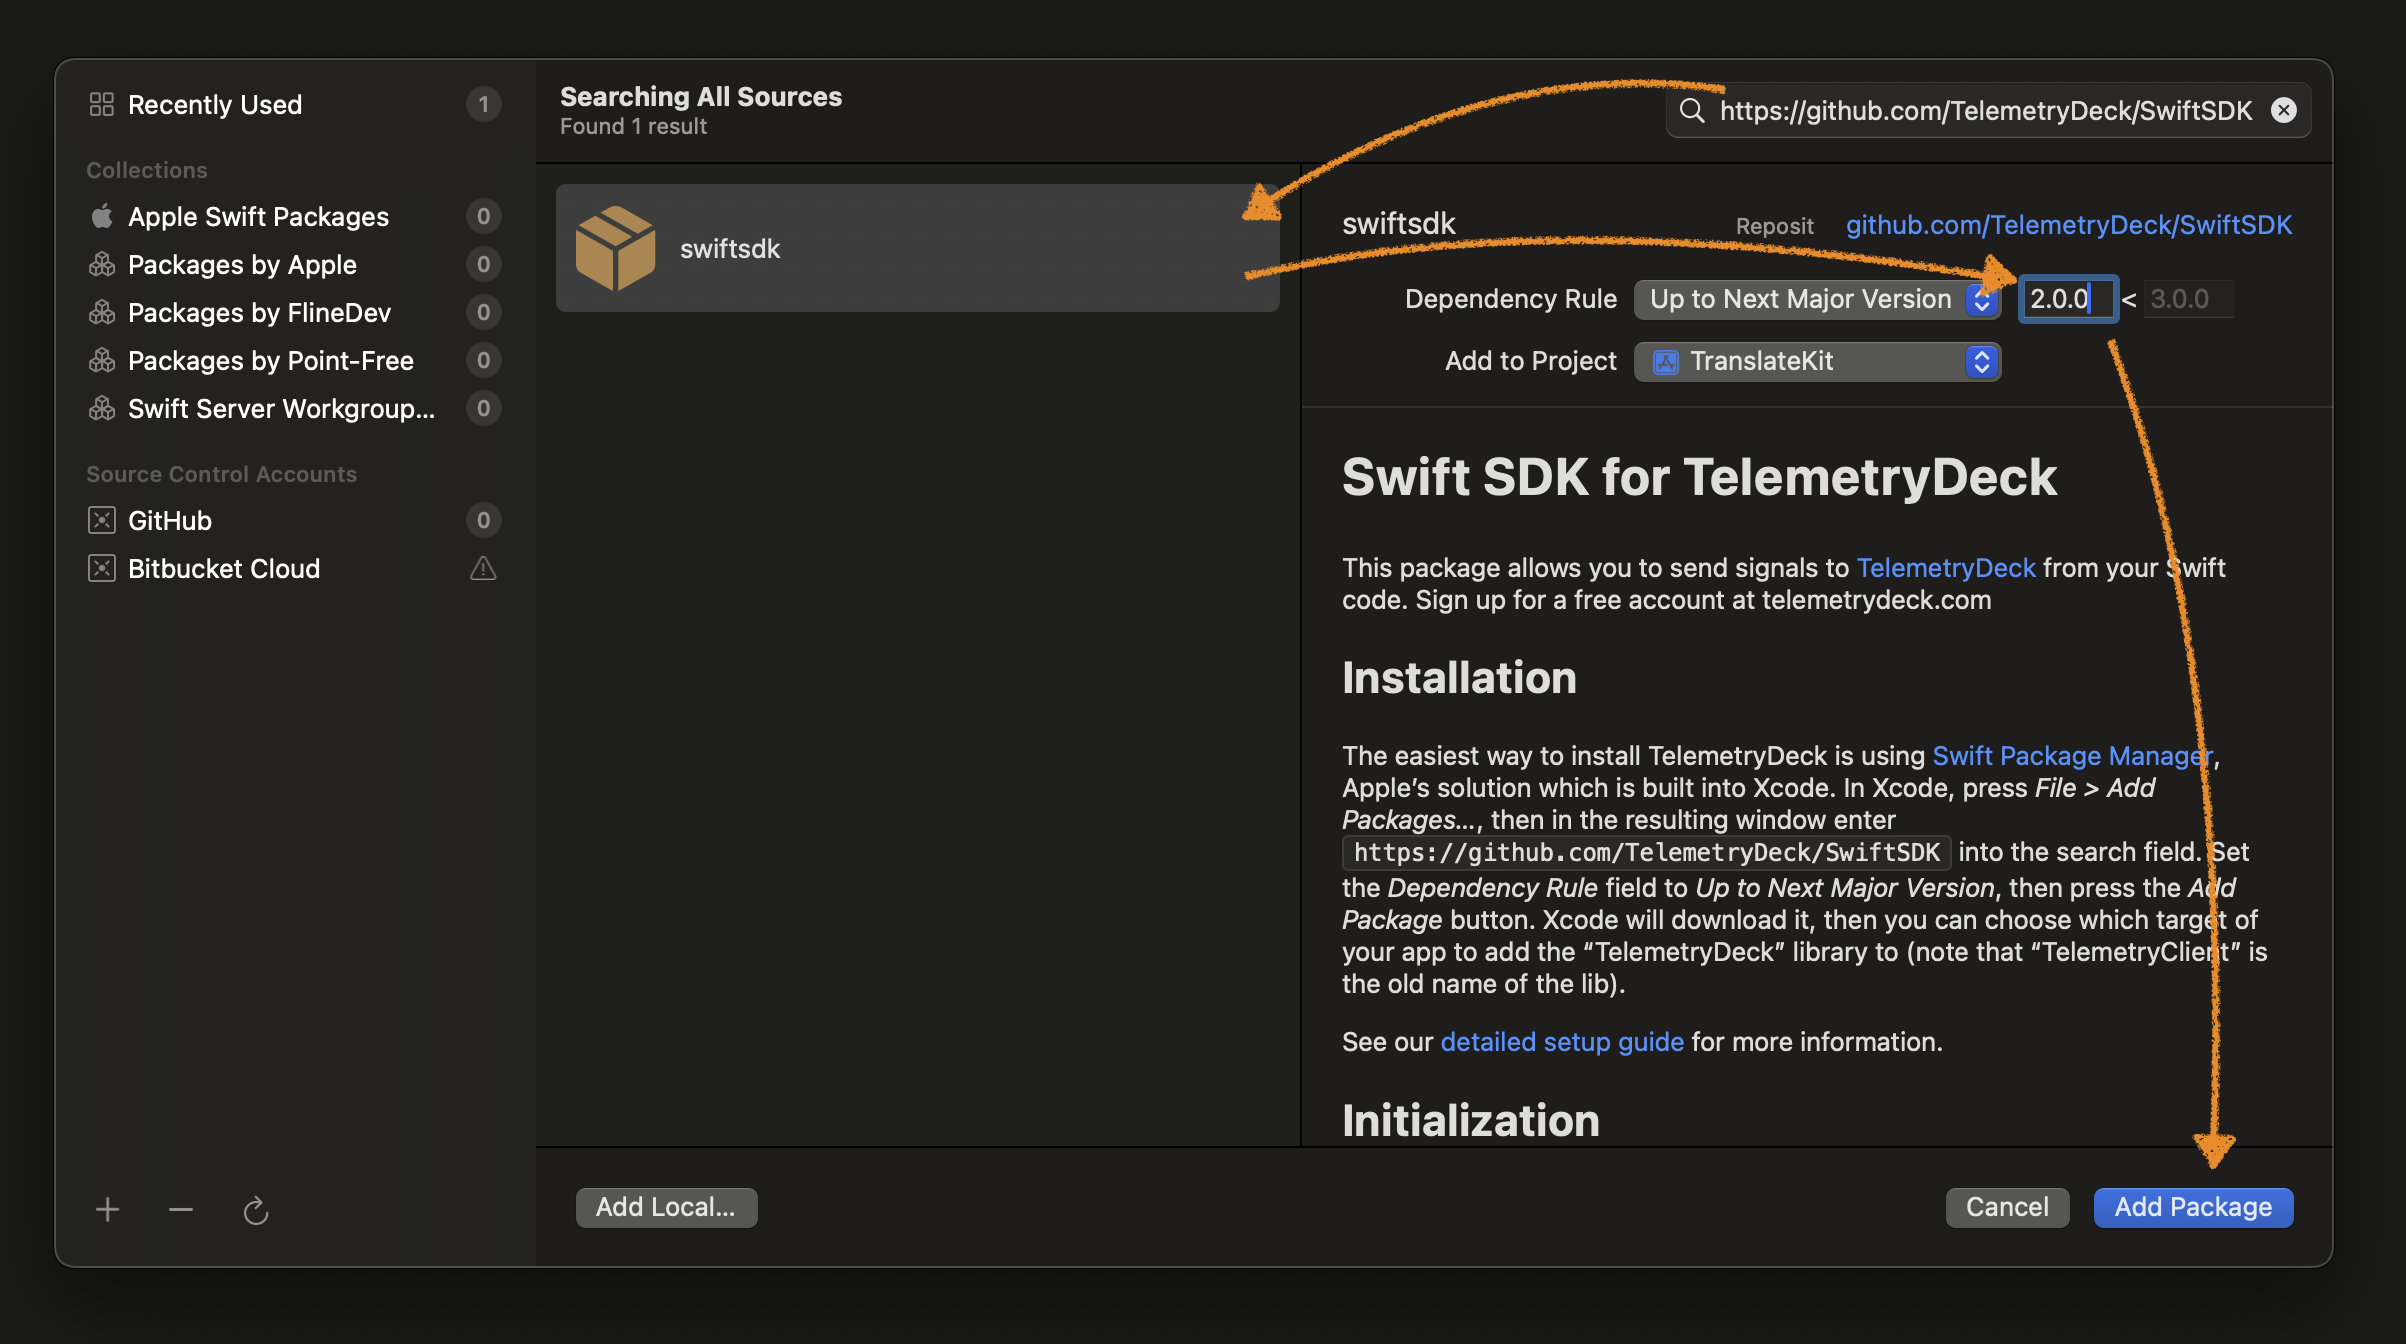
This will include the TelemetryDeck Swift SDK into your app by downloading the source code. Feel free to browse the client’s source code, it’s tiny and you’ll see for yourself how TelemetryDeck is hashing user identifiers before they ever reach the server. Privacy, yay!
Watch our Quick Start video to setup TelemetryDeck in 4 Minutes!
Including the package in your target
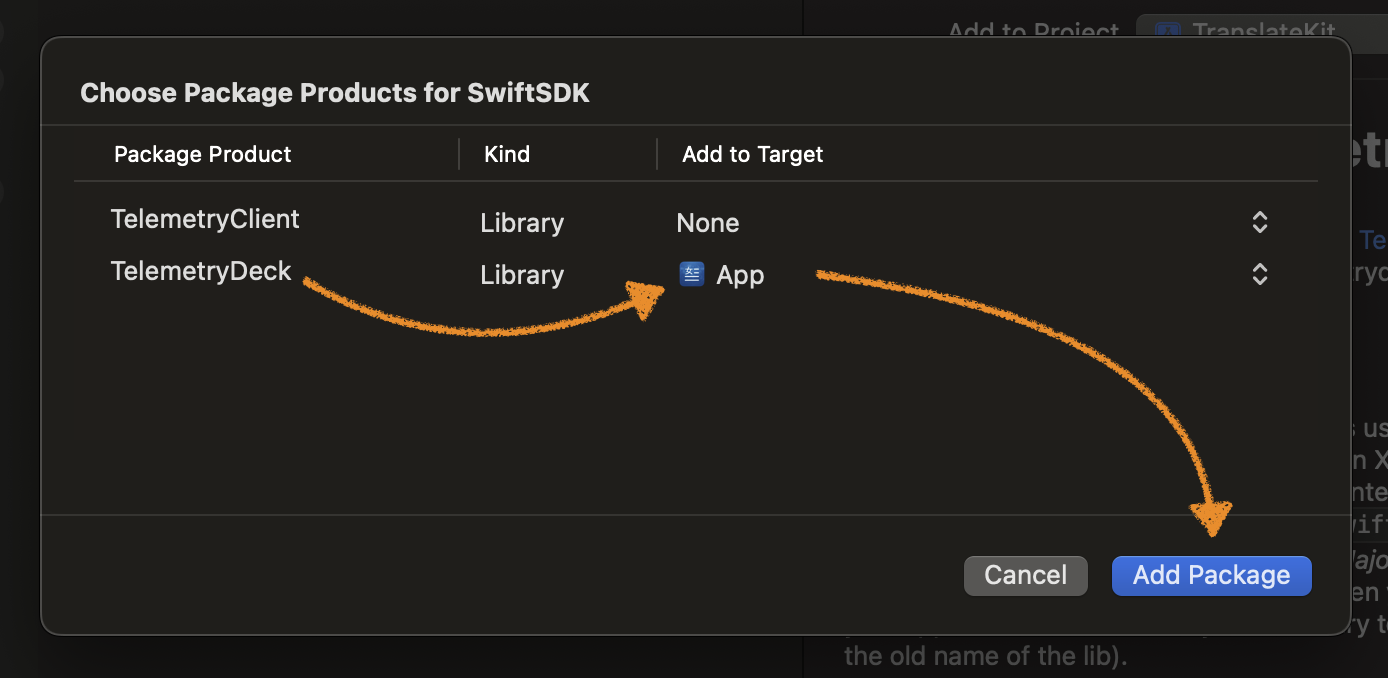
Xcode will ask you to link the package with your target in the next screen, titled Choose Package Products for SwiftSDK. Set the Add to target column to your app target for TelemetryDeck (not “TelemetryClient”, which is deprecated) and click Add Package to complete the integration.
Initializing the TelemetryDeck Swift package
The TelemetryDeck package will provide you with a class TelemetryDeck that you’ll use for all interactions with TelemetryDeck. Before you can use that class, you’ll need to initialize it at the start of your app. We strongly recommend doing so as soon as possible, as you won’t be able to send events before the TelemetryDeck is initialized.
This is slightly different depending on whether you use SwiftUI or UIKit’s AppDelegate to manage your app’s lifecycle, so let’s look at these individually.
You only need one way of initializing the TelemetryDeck SDK, either SwiftUI/SceneKit or AppDelegate. If your app is new, you’ll likely want to use SwiftUI/SceneKit.
Initialization with SwiftUI
For Scene-based SwiftUI applications, we recommend adding the initialization to your @main App struct! Open YourAppNameApp.swift and look for code that looks like this:
import SwiftUI

@main
struct YourAppNameApp: App {
    var body: some Scene {
        WindowGroup {
            ContentView()
        }
    }
}
This is the entry point to your app. Now let’s add the initialization here.
Import the TelemetryDeck Package by adding import TelemetryDeck. Then add an init() method to your App struct that creates a TelemetryDeck.Config instance and hands it to TelemetryDeck.initialize(config:), using the Unique Identifier of your app that you copied into your clipboard earlier. If you don’t have that anymore, you can get it at any time from the TelemetryDeck Dashboard.
Your code should now look like this:
import SwiftUI
import TelemetryDeck

@main
struct YourAppNameApp: App {
    init() {
        let config = TelemetryDeck.Config(appID: "YOUR-APP-ID")
        TelemetryDeck.initialize(config: config)
    }

    var body: some Scene {
        WindowGroup {
            ContentView()
        }
    }
}
If you prefer to have it on a single line, you can also write:
TelemetryDeck.initialize(config: .init(appID: "YOUR-APP-ID"))Your app is now ready to use TelemetryDeck. You can skip the next section which explains setup for UIKit-based apps.
Initialization in an AppDelegate based app
If you use AppDelegate to manage your app’s life cycle, open the file AppDelegate.swift and look for the method application(:didFinishLaunchingWithOptions:). It will probably look similar to this:
import UIKit

@main
class AppDelegate: UIResponder, UIApplicationDelegate {
    func application(_ application: UIApplication, didFinishLaunchingWithOptions launchOptions: [UIApplication.LaunchOptionsKey: Any]?) -> Bool {
        // Override point for customization after application launch.
        return true
    }

    // ...
}
By default, Xcode even adds a comment here to tell you where to add stuff that should happen right after launch.
Now, import the TelemetryDeck package and configure the TelemetryDeck using the Unique Identifier of your app that you copied into your clipboard earlier. If you don’t have that anymore you can get it at any time from the TelemetryDeck Dashboard.
import UIKit
import TelemetryDeck

@main
class AppDelegate: UIResponder, UIApplicationDelegate {
    func application(_ application: UIApplication, didFinishLaunchingWithOptions launchOptions: [UIApplication.LaunchOptionsKey: Any]?) -> Bool {

        let config = TelemetryDeck.Config(appID: "YOUR-APP-ID")
        TelemetryDeck.initialize(config: config)

        return true
    }
    // ...
}
Verify your setup
Run your app to verify that TelemetryDeck is properly integrated. The SDK automatically sends a TelemetryDeck.Session.started signal when your app launches.
Open the TelemetryDeck Dashboard, navigate to “Explore > Recent Signals” and make sure “Test Mode” is enabled. You should see the automatic session signal appear after launching your app.
Enhancing your analytics (optional)
While basic session tracking provides valuable information, sending custom events lets you answer questions specific to how users engage with your app.
Common questions you can answer with custom events
- Which features do users engage with most frequently?
- Where in the onboarding flow do users drop off?
- How are users navigating between different screens?
- Which settings or configurations are most popular?
Sending custom events
Let’s imagine your app is a pizza oven monitor and we want to send a signal that tells us the user has tapped the “Start Baking” button. Go to the place in your code where the user taps the button and add the following code:
TelemetryDeck.signal("Oven.Bake.startBaking")That’s all you need to send a signal. You do not need to keep an instance of TelemetryDeck and hand it around, just call the static signal function on the class directly. If you want to add custom parameters, add them to the function call like this:
TelemetryDeck.signal(
    "Oven.Bake.startBaking",
    parameters: [
        "numberOfTimesPizzaModeHasActivated": "\(dataStore.pizzaMode.count)",
        "pizzaCheeseMode": "\(dataStore.pizzaCheeseMode)"
    ]
)Configuring default signal properties (optional)
When initializing TelemetryDeck, you can configure some defaults to help keep your signals organized and consistent:
let config = TelemetryDeck.Config(appID: "YOUR-APP-ID")

// Add a prefix to all signal names
config.defaultSignalPrefix = "App."
// With this set, calling signal("launched") will actually send "App.launched"

// Add a prefix to all parameter names
config.defaultParameterPrefix = "MyApp."
// This prefixes all keys in your parameters dictionary

// Set parameters that will be included with every signal
config.defaultParameters = {[
    "theme": UserDefaults.standard.string(forKey: "theme") ?? "default",
    "isPayingUser": FreemiumKit.shared.hasPurchased ? "true" : "false",
]}
// These parameters will be merged with any additional parameters you specify in signal() calls
App Store requirements
Before uploading your app to the App Store, you’ll need to complete Apple’s privacy details on App Store Connect. Although TelemetryDeck is privacy-focused, you still need to disclose analytics usage.
For guidance on completing these requirements, see our Apple App Privacy guide. For privacy policy recommendations, check our Privacy FAQ.
What to do next
Now that you’ve integrated TelemetryDeck, learn how to use the analytics platform to gain valuable insights about your users:
📊 Analytics Walkthrough
Learn how to navigate TelemetryDeck, interpret insights, and use analytics to make data-driven decisions that improve your app and grow your user base.
Start here to get real value from your analytics →